
v2.3.0
This is the redistribution guide for the VCAcore Video Analytics system
The user is able to customize the appearance and title of the browser page including the tab icon.
The file custom-names.json allows the user to override the browser page title. To customize the value replace title value with the desired name:
{
  "document": {
    "title": "VCA"
  }
}
A favicon.ico file located in the share/vca-cored/www/resources subdirectory can also be replaced by the user.
Below is a guideline image demonstrating which UI elements these changes impact:
The VCAcore installation folder contains files that define the colours used by the components in the web UI: custom-theme.css and default-theme.css.
All files are located in the VCAcore installation folder, in the share/vca-cored/www subdirectory of the main VCAcore installation folder.
The file custom-theme.css overrides the default theme. To customize the colours in the UI, the user may:
default-theme.css into custom-theme.css. The first two sections define the Main and semantic colours, respectively.custom-theme.cssEach colour is defined as follows:
--vca-colours-primary: #cc0000;
^                      ^
Colour name            Colour hex value
Any colours defined in custom-theme.css will override the default theme. For any colours not defined in the custom theme, the defaults will be used.
Note: The initial section in default-theme.css defines the basic colours, from which all other colours are derived. Changing the colours in the following sections is only needed when individual components are to be themed separately.
A logo.svg file located in the share/vca-cored/www/resources subdirectory can also be replaced by the user. The logo file must be in SVG format and should have an approximate size of 400px x 400px.
To enable rapid prototyping for custom themes for VCAcore, the entire UI can be re-coloured using just 11 variables.
Below are some guideline images demonstrating which of these variables relate to which UI elements:


The user is able to customize some ONVIF Identification strings.

The file custom-names.json allows the user to override the following strings:
| ONVIF Identification Value | JSON Property | default value if left blank |
|---|---|---|
| Name | product_name |
The Hostname of the host system |
| Manufacturer | product_manufacturer |
VCATechnology |
| Model | product_model |
The release version of VCAserver e.g. 2.1.1 |
| Hardware | product_hardware |
The Hostname of the host system |
| Firmware | product_firmware |
The release version of VCAserver e.g. 2.1.1 |
| Location | product_location |
global |
To customize the values replace the appropriate JSON property with the desired value:
{
  "document": {
    "title": "VCA"
  },
  "core": {
    "product_name": "VCAServer",
    "product_manufacturer": "VCA",
    "product_model": "ABC1234",
    "product_hardware": "AI_BOX",
    "product_firmware": "1.0.0",
    "product_location": "global"
  }
}
ONVIF Identification strings do not support spaces, and will cause the system not to be discovered in certain cases.
The user is able to customize the names of the licenses.
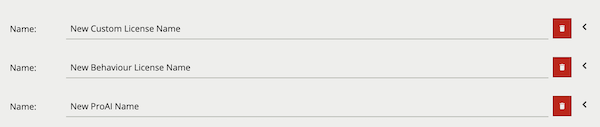
The file custom-names.json allows the user to define the new license names based on the license code:
| JSON Property | Description |
|---|---|
code |
The license code (see example) |
name |
The new license name for the associated code |
To customize the license names add a new entry to the array with the code of the license to change and desired new name.
{
  "document": {
    "title": "VCA"
  },
  "licenses":[
    {
      "code": 4487,
      "name": "New ProAI Name"
    },
    {
      "code": 4488,
      "name": "New Custom License Name"
    },
    {
      "code": 12548,
      "name": "New Behaviour License Name"
    }
  ]
}The VCAcore application is self contained, with no dependencies outside the operating system. Any other redistribution changes are also contained in the VCAcore application directory. This allows for those changes to also be repacked into a custom installer.
Below are a list of considerations when creating a customer installer for either Windows 10 or an Ubuntu 18.04 based system.
The VCA Windows installer creates an MSI installer file using the WIX toolset. There are many installer creation packages which could be used. The installer should perform two key tasks:
vca-core-service executableThese are the minimum requirements for a customer installer.
The default install location for VCAcore is C:\Program Files\VCA-Core\. The file structure within this folder can be moved anywhere on the system and run. The contents of the VCA-Core directory including folders, executables and files (unless otherwise stated) must remain unchanged.
VCA-Core/
  bin/
  doc/
  lib/
  recovery-root/
  share/
  version.txt
During the VCA Windows install process the user is able to define a custom location for this directory.
As part of the VCA install process a windows service is created. The service Startup type is set to automatic, indicating the service is configured to start when the system boots.
The service manages the running of the vca-core-service executable found in C:\Program Files\VCA-Core\bin\vca-core-service.exe. If changes are made to default install locations, these will need to be reflected in the service. The recovery web UI can be defined as an argument to the vca-core-service.exe.
A custom configuration location can be defined by setting VCA_DATA_DIR=C:\VCA-Core\. This environment variable needs to be set at a system, not user level.
The web UI port can also be defined by creating a custom configuration file with just the web_port property defined. Other custom configuration settings can be added at this stage if required.
The VCA Ubuntu installer is a bash script which performs two key tasks:
systemd service to automate the running of the vca-core-service executableThese are the minimum requirements for a customer installer.
The default install location for VCAcore is /opt/VCA-Core/. The file structure within this folder can be moved anywhere on the system and run. The contents of the VCA-Core directory including folders, executables and files (unless otherwise stated) must remain unchanged.
VCAcore/
  bin/
  doc/
  lib/
  recovery-root/
  share/
  version.txt
During the VCA Ubuntu install process the user is able to define a custom location for this directory.
As part of the VCA install process a systemd service file is created in /etc/systemd/system/vca-core.service. The service is set enabled, indicating the service is configured to start when the system boots.
The systemd service manages the running of the vca-core-service executable found in /opt/VCA-core/bin/. If changes are made to default install locations, these will need to be reflected in the vca-core-service file. During the VCA Ubuntu install process the user is able to define a port for the recovery web UI. The installer then updates the systemd service to use this port as an argument for the vca-core-service executable. See the default vca-core.service file for reference.
The systemd service also defines some environment variables, specifically where the VCAcore configuration file is stored. By default VCA_DATA_DIR=/var/opt/VCA-Core, this can be changed as required. During the VCA Ubuntu install process the user is able to define a port for the VCAcore web UI. This creates a custom configuration file with just the web_port property:
default_config_path="/var/opt/VCA-Core"
mkdir -p $default_config_path
echo '{"settings": { "web_port" : '"${vca_core_port}"' } }' >
$default_config_path/api.json
Other custom configuration settings can be added at this stage if required.
Other service managers can be used if preferred. The contents of the default vca-core.service can be used as a template for other service solutions.
The following is an example of how the VCAserver installation can be repackaged for rebranding. This example uses zip and unzip to complete the process.
*Note: Ensure nano, zip and unzip are installed and working correctly.
apt install nano
apt install zip
apt install unzip
In this example, the following steps are performed. All commands are run with sudo rights.
zip the existing installation into a zip file, maintaining the folder structure.
Record the contents of the service file.
On the target system, create the application folder.
Unzip the application files into the new application folder.
Create a new service file and copy in the service file contents.
Update the systemd records and start the service on the target computer.
Prepare the application before performing the zip function, making any required changes to the theme and adding any icons.
Zip the contents of the application folder into a zip file. Navigate to the application folder.
cd /opt/VCA-Core
zip -r /home/<profilename>/zipfile.zip ./

cat /etc/systemd/system/vca-core.service
An example of the contents is shown below, check the installed version as contents may change.
[Unit]
Description=Analytics Service
ConditionPathExists=/opt/Analytics/bin/vca-core-service

[Service]
Environment=VCA_DATA_DIR=/var/opt/Analytics
LimitNOFILE=100000
ExecStart=/opt/Analytics/bin/vca-core-service -p 9090 --
Restart=always

[Install]
WantedBy=multi-user.targetNote: Ensure the target system has all the prerequisites required. If the DL trackers will be used, then an appropriate Nvidia GPU device should be installed, along with the Nvidia GPU drivers and correct CUDA toolkit.
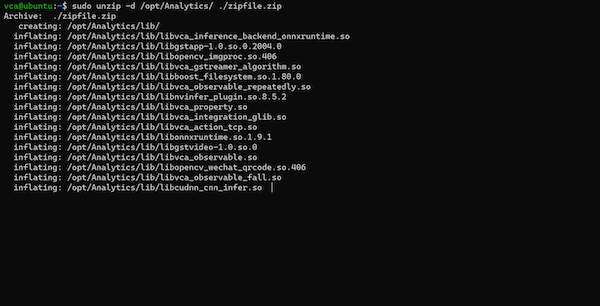
Analytics.mkdir /opt/Analytics
unzip -d /opt/Analytyics/ ./zipfile.zip
The service file is created to control the status of the application, It will start and stop the application. The name of the service file can be customized as required. In this example, we are using the nano editor and the name of the service file is analytics.service.
nano /ets/systemd/system/analytics.service
Enter the contents noted from the service file on the original system. The Following sections can be customized as required.
Description=Service name
ConditionPathExists=/opt/Application folder/bin/vca-core-service
Environment=VCA_DATA_DIR=/var/opt/Name
ExecStart=/opt/Application folder/bin/vca-core-service -p 9090 –
For this example, we have used the following.
[Unit]
Description=__Analytics Service__
ConditionPathExists=/opt/__Analytics__/bin/vca-core-service

[Service]
Environment=VCA_DATA_DIR=/var/opt/__Analytics__
LimitNOFILE=100000
ExecStart=/opt/__Analytics__/bin/vca-core-service -p 9090 --
Restart=always

[Install]
WantedBy=multi-user.targetnano editor and save the changes.Exit = CTRL+X Save = Y
systemctl enable analytics.service
systemctl daemon-reload
systemctl start analytics.service
The installation is now complete and the user interface is now available to connect in to from a browser.
The status of the service can be confirmed with the command
systemctl status analytics.service

VCAcore actions have body fields allowing the user to define content to be sent when an event fires an action. By default, all action body fields have both a None and Custom option available from a drop down menu. In some cases other predefined options are also provided by default. Additionally, subject fields (email) and header fields (HTTP) also have defined options available from drop down lists.
These options are defined by the JSON action templates. The configuration files can be edited to alter, remove or add to the default options. The Email, TCP and HTTP action configuration files are found in the share/vca-cored/www/resources/ subdirectory of the main VCAcore installation folder.
tcp-templates.jsonhttp-templates.jsonemail-templates.jsonThe user can select a template defined in the configuration files from the drop down menu next to a field. For example, in the below image an HTTP template HTTP Action Template has been defined and selected by the user for this HTTP action’s header and body fields. The template will update the UI fields appropriately.

The TCP action template is made up of four properties:
| Property | Type | Description | Possible values |
|---|---|---|---|
name |
String | A user-specified name used in the drop down box | Any string, can be empty |
type |
String | Internal variable, should always be custom |
custom |
body |
String | Content of the action body, e.g VCAcore tokens, XML, JSON etc as required | Any string, can be empty |
read_only |
Boolean | Defines if, when selected, the content of the body (or header or subject) can be edited by the user in the UI | true |
{
    "name": "OEM TCP Action",
    "type": "custom",
    "body": "{ \"event_name\": \"{{name}}\", \"event_id\": {{id}} } ",
    "read_only": false
}In addition to the four properties found in the TCP template, an HTTP template has the additional property to define the HTTP action’s headers. The HTTP template name is used in the drop down list for both the body and header.
| Property | Type | Description | Possible values |
|---|---|---|---|
header |
String | Content of the HTTP action header | Any string, can be empty |
{
    "name": "OEM HTTP Action",
    "type": "custom",
    "headers": "Content-Type: application/json",
    "body": "{ \"event_name\": \"{{name}}\", \"event_id\": {{id}} } ",
    "read_only": true
}In addition to the four properties found in the TCP template, an Email template has an additional property to define the Email’s subject line. The Email template name is used in the drop down list for both the body and subject.
| Property | Type | Description | Possible values |
|---|---|---|---|
subject |
String | Content of the Email action’s subject | Any string, can be empty |
{
    "name": "OEM EMAIL Action",
    "type": "custom",
    "subject": "{{type.string}} from Cam ID {{#Channel}}{{id}}{{/Channel}}",
    "body": "{{name}} triggered with at {{start.iso8601}}",
    "read_only": true
}
The read_only option within a template is used to prevent the template content from being changed once the field is populated in the UI. However, in some cases it will be required to allow the user to change the field’s content after selecting a template, allowing for entry of additional data (e.g. header tokens or other identifiers).